
ブログに送られてくるメールの中には、悪意のあるメール(スパムメール)もあります。
 けーさん
けーさん訳の分からない英文メールも数が多くなるとウットウシくなりますよね。
 はるこ
はるこそんなスパムメールをブロックしたり、ボット攻撃による不正なログインを防ぐのにreCAPTCHAを使っている人も多いいんじゃ無いかな。
▼reCAPTCHAについて詳しくはこちらで、
私もしばらくreCAPTCHA v3を使ってましたが、サイトの健全性を計るPageSpeed Insights上で改善できる項目として、reCAPTCHAのJavaScriptが指摘されました。
けーさんそこでサイトスコアを少しでも上げたくて、reCAPTCHAを外してみたんですが、とたんにウットウシイメールが届くようになった。
なにか良い方法はないものかと、しばらくネットで解決策を探し回っていました。
すると、hCaptchaがサイト表示の負荷も少なく、同等の機能を備えてるらしいことが分かりましたので、早速取り入れてみることにしました。
今回は、reCAPTCHAの代わりに取り入れたhCaptchaの導入方法と、PageSpeed Insightsのスコアの変化についてお話します。
hCAPTCHAとは
hCaptchaとはBotStopが提供している認証システムで、不正ログインを試みるBOTなどからWebサイトを守り、スパムコメント対策にも利用することが出来るサービスです。
はるこセキュリティを強化するという点では、reCAPTCHAと同じですね。
reCAPTCHAとhCaptcha
reCAPTCHA v3とhCaptchaの違いを簡単に比較してみます。
| reCAPTCHA v3 | hCaptcha | |
| プライバシー | プライバシー保護に不安 | 不安は少ない |
| ユーザビリティ | サイト訪問者の操作不要 | 認証が煩わしい |
| サイトスコア | 悪くなる | 影響は少ない |
| 利用料 | 将来的に有料になる可能性 | 無料 |
大まかには以上のような違いがあります。
けーさんreCAPTCHAは将来的に有料となると言われており、そのため特に企業サイトではhCaptchaに乗り換えているところが増えています。
比較してみると両社にそれぞれ一長一短あるようですが、サイトスコアを意識される方には、hCaptchaの方がよさそうです。
hCaptchaを使う準備
hCaptchaを利用する前の準備を説明します。
アカウントの作成
hCaptchaを利用するには、まずアカウント登録が必要です。
hCaptchaの公式サイトを開きます。
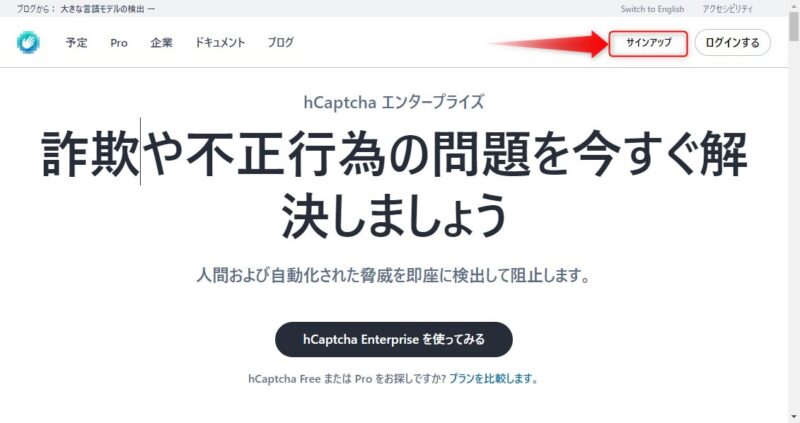
サイト上部の「サインアップ」をクリック、
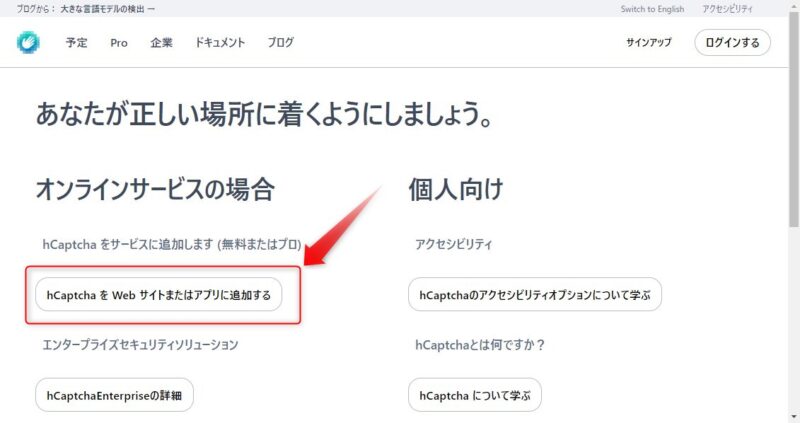
上図の「hCaptchaをWebサイトまたはアプリに追加する」をクリック、
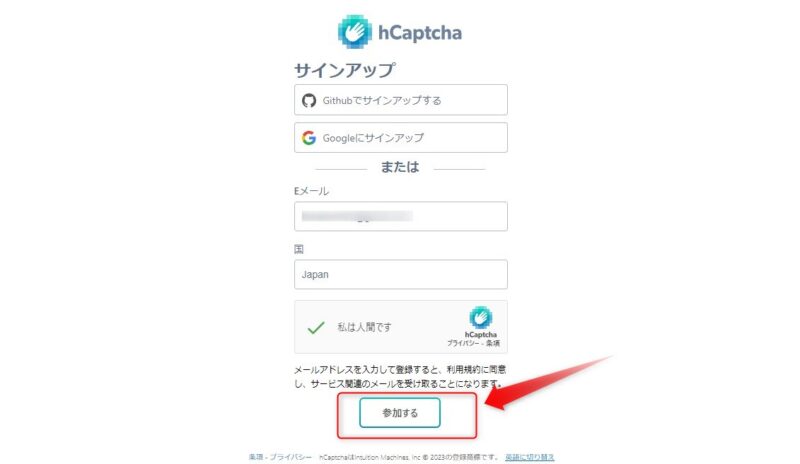
サインアップの画面で、メールアドレス・国名を記入し「私は人間です」にチェックを入れ参加するをクリック、
ここで記入したメールアドレスにhCaptchaから以下のようなメールが届きます。
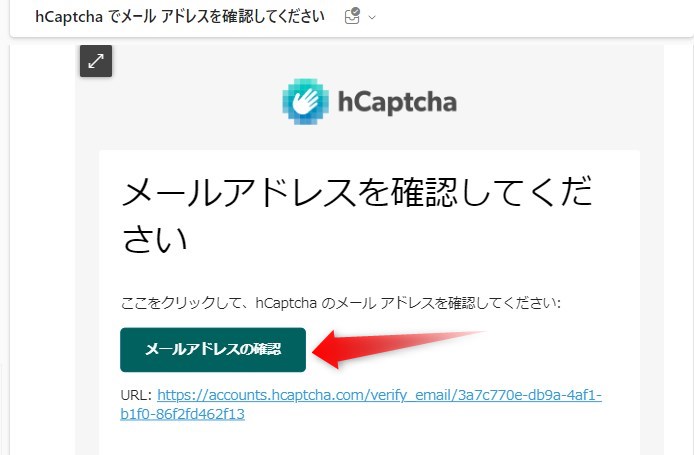
メールアドレスの確認を押してログインパスワードを設定してください。
はるここのメールは意外と見落としがちなので、ここでパスワードを設定しておかないと後でログイン時に困ってしまいますよ。
パスワードの設定を終えたら下の画面に移ります。
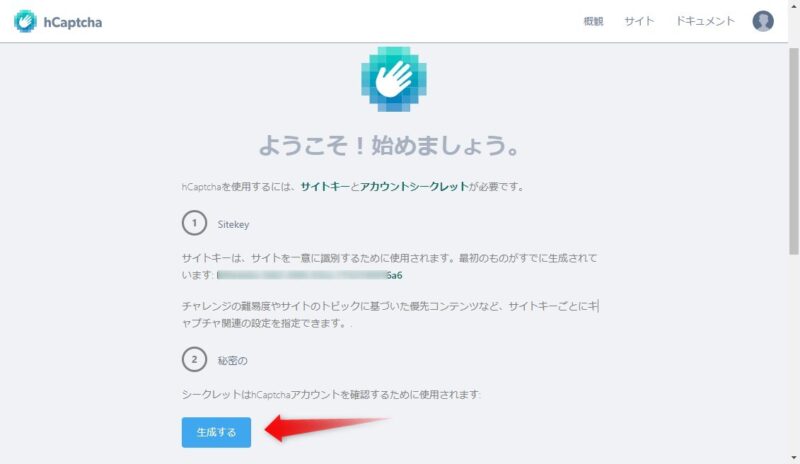
「ようこそ」画面に移ると、サイトキーが表示されています。ここのサイトキーはコピーを取らなくても大丈夫。
続いてシークレットキーを作成するために②の生成するボタンをクリック、
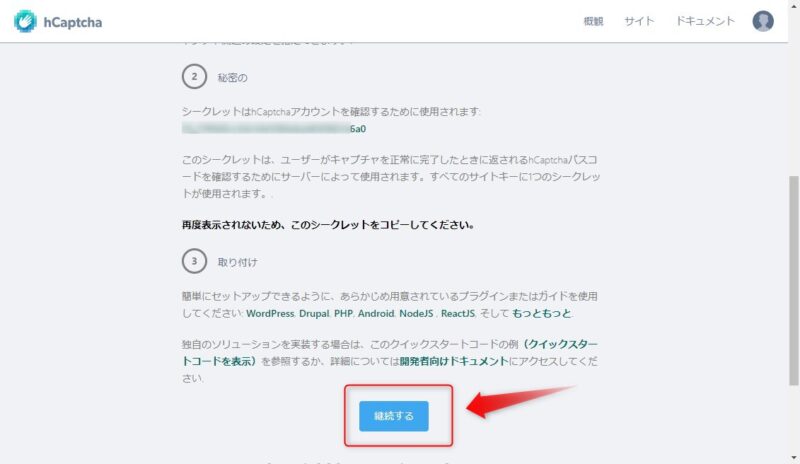
シークレットキーが表示されたら継続するをクリック、
はるこここのシークレットキーもコピーしておかなくても大丈夫ですよ。
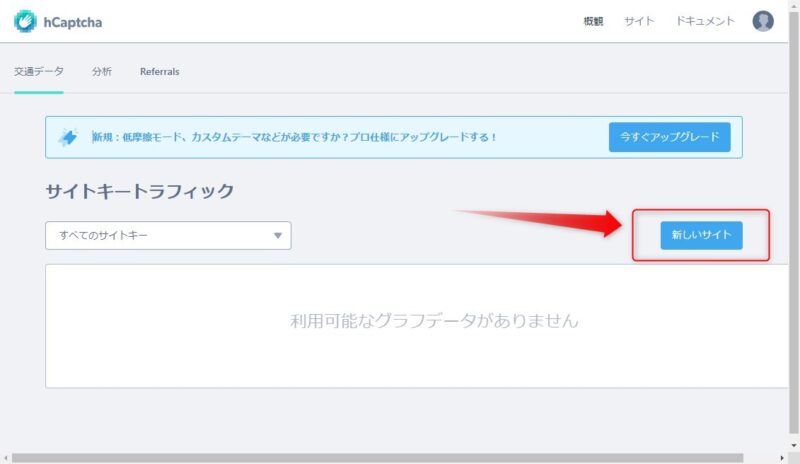
上図が出たら、hCaptchaを利用するサイトの登録に移りますので、新しいサイトをクリック、

①新しいサイトキーを追加のところに、サイトのタイトルなど(基本どんな名前でもいいけど)を記入し、必ずEnterキーを押してください。
②一般情報のところにサイトのURLを記入します。
※URLの例
ksanhonsan.comURLはhttps://を省いてくださいね。そうしないとうまくいきません。
③URLを記入したら右側の新しいドメインの追加をクリック、
同画面を下の方にスクロールしてhCaptchaの動作を選択します。
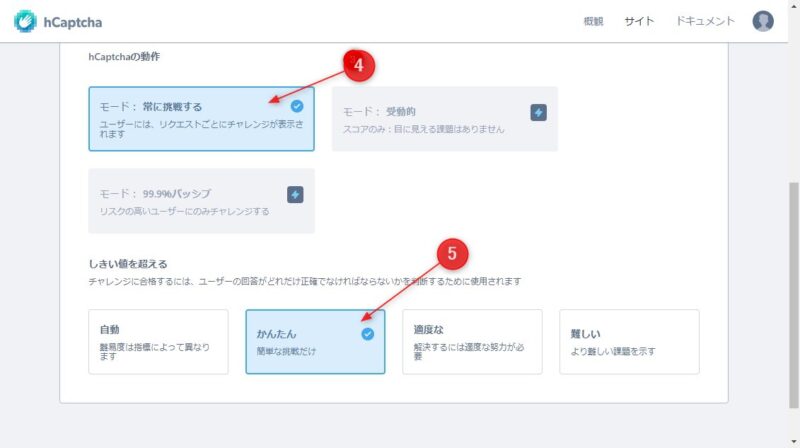
④ここでの動作は無料の場合、「常に挑戦する」しか選択できません。
⑤「しきい値を超える」はサイトを訪れたユーザーの操作を選択するんですが、始めのうちは「かんたん」でいいと思います。
⑥設定を終えたら画面上部の保存をクリックして完了です。
サイトキーとシークレットキー取得
後ほどインストールするwordpressのプラグインに必要な、サイトキーとシークレットキーを取得します。
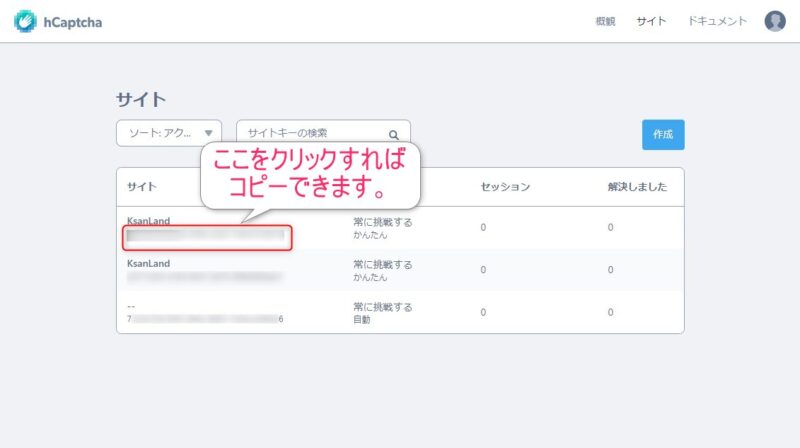
・サイトキーは「サイト」画面に表示されている登録サイト名に下に表示されているので、クリックするとコピーできます。
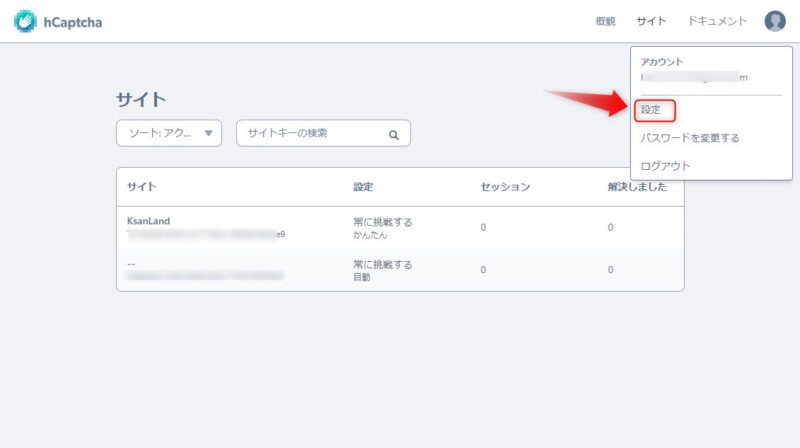
・シークレットキーは、hCaptchaの画面右上にある自分のアイコンをクリックしプルダウンメニューから「設定」を選択します。
すると、
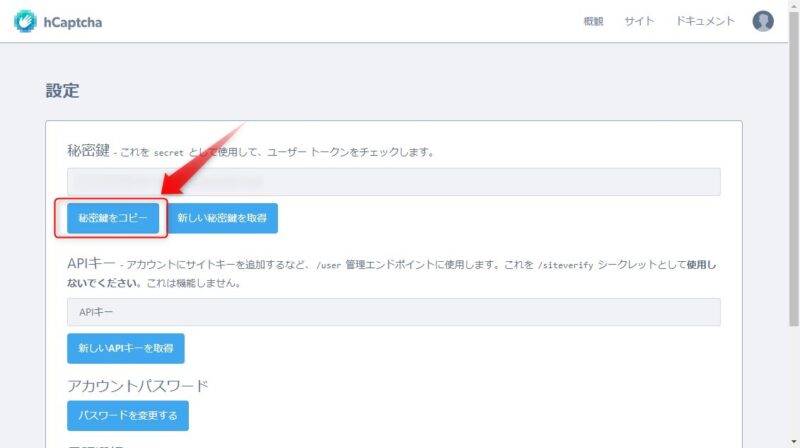
設定画面の中に秘密鍵をコピーボタンがありますので、そこをクリックすればコピーできます。
はるこサイトキーとシークレットキーはコピーしたらメモ帳などに保存しておくといいわね。
プラグインのインストールと設定
wordpressでhCaptchaを利用するにはプラグインが必要です。
プラグインは、hCaptcha for WordPressです。
hCaptcha for WordPressのインストール
wordpressのダッシュボード⇒「プラグイン」⇒「新規追加」とたどります。
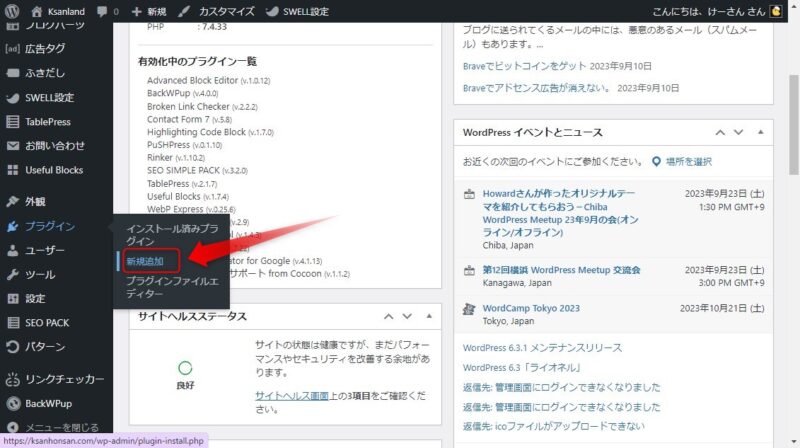
「新規追加」の画面のプラグイン検索ボックスに「hCaptcha」と入力、
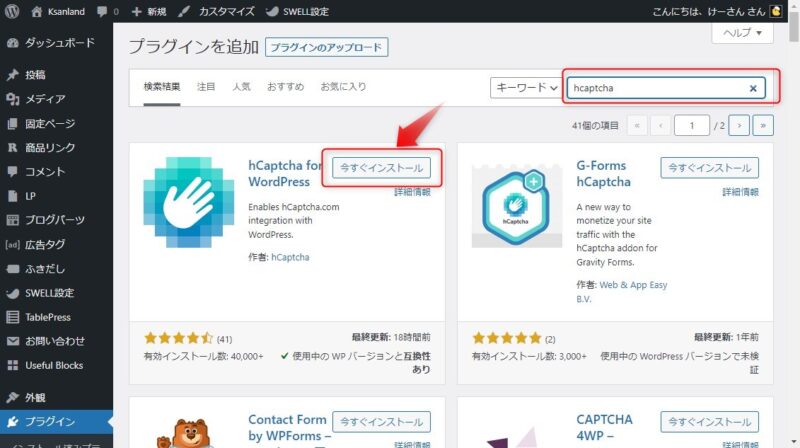
すると、「hCaptcha for WordPress」が表示されますので、今すぐインストールをクリックし、有効を押してください。
hCaptcha for WordPressの設定
wordpressのダッシュボード⇒「設定」⇒「hCaptcha」と辿り設定画面を開きます。
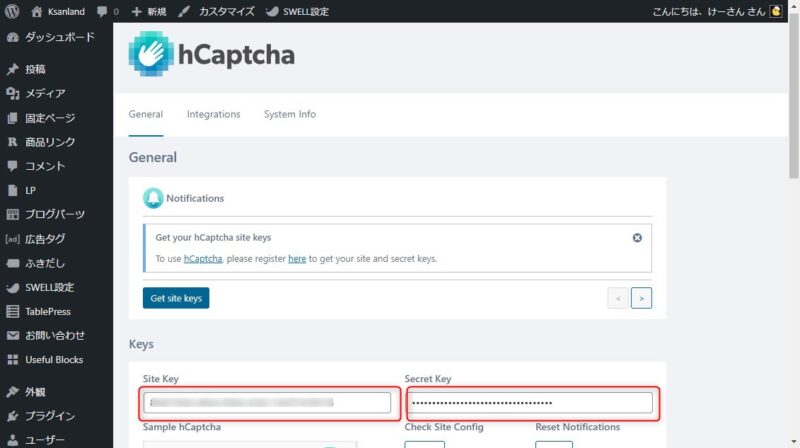
設定画面のGeneralメニュー「Keys」のところに先ほどコピーした、サイトキーとシークレットキーを貼りつけます。
貼り付けたらページの一番下の変更を保存ボタンを押してください。
次に、integrationsメニューを開き、「Active plugins and themes」のところからhCaptchaを適用させたい項目を選択します。
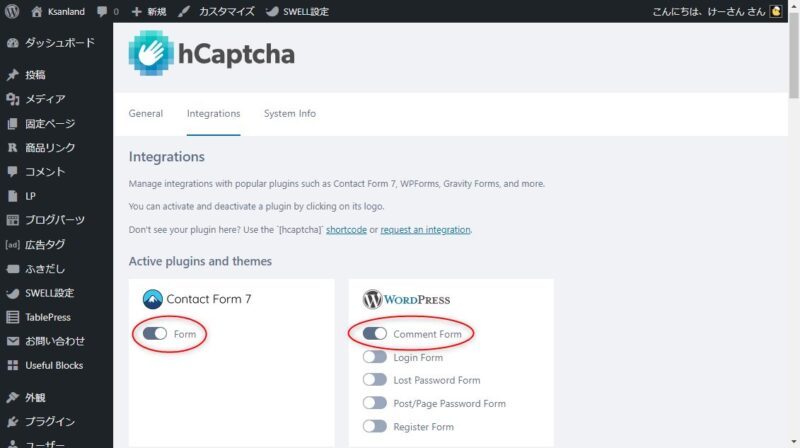
上図では、Contact Form7とComment formをONにしています。
はるこどこにhCaptchaを適用するかは各自で判断してくださいね。
けーさん私はContact Form7とComment formだけに適用させてます。
設定したら一番下の変更を保存ボタンを忘れずに押してください。
以上でhCaptchaの導入は完了しました。
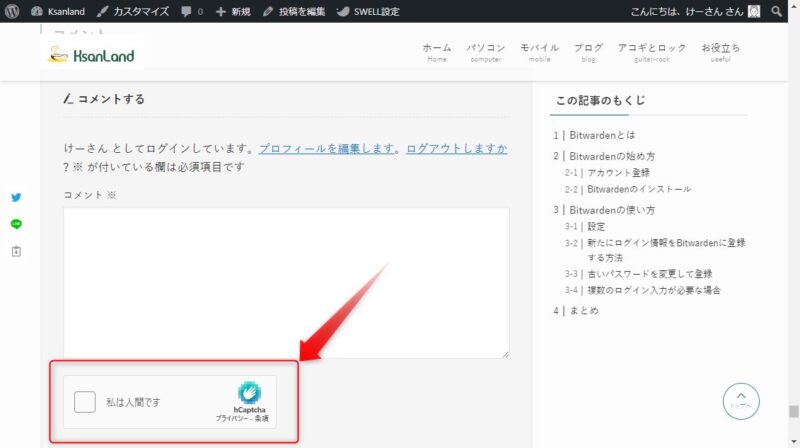
うまく導入できていれば、Contact Form7やComment formの画面にhCaptchaの認証画面が表示されているはずです。
PageSpeed Insightsのスコア
さて一番気になるのはhCaptchaを導入した後のサイトスコアです。
ちなみに、reCAPTCHA使用時のPageSpeed Insightsのスコアは、
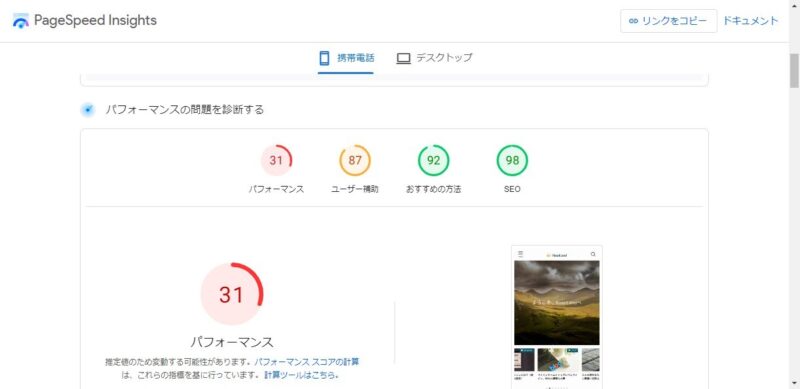
モバイルのパフォーマンススコアは31でした。
reCAPTCHAを外すと、
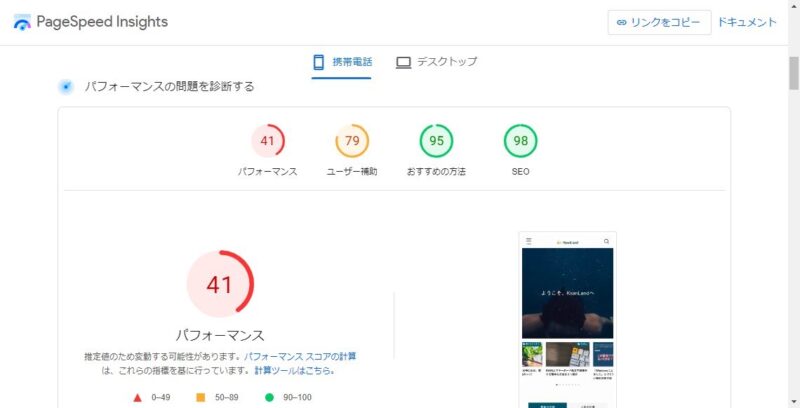
スコアは41に上がりました。
ではhCaptchaを導入した後のスコアは?
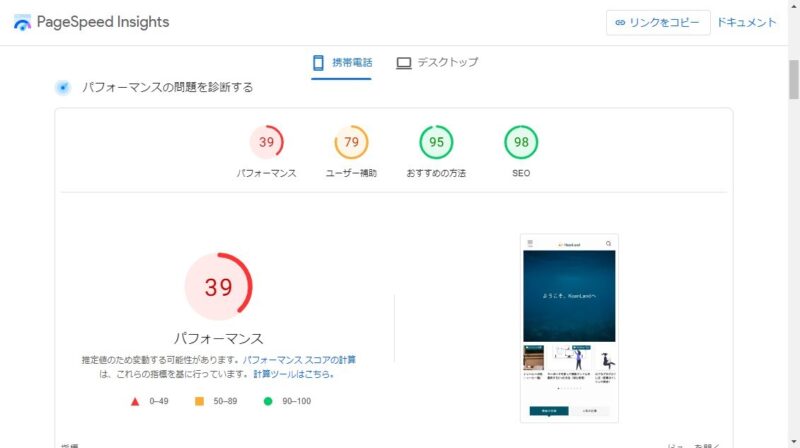
パフォーマンススコアは39でした。
けーさんhCaptchaを使う前と使った後のスコアを比べると、これはほとんど誤差の範囲ですね。
と言うことで結論。
hCaptchaはPageSpeed Insightsのスコアにほとんど影響しない。
でいいかな?
まとめ

今まで利用していたreCAPTCHAがサイトスコアを悪くしていたので、hCaptchaに乗り換えました。
結果前述したように満足できる結果が出ましたので、これからはhCaptchaを使い続けるつもりです。
ネット上のサイトは常にBOT攻撃やスパム攻撃にさらされています。
そこでサイト運営者はあらゆるセキュリティ対策を考えなければなりません。
あなたのセキュリティ対策の一つとして、hCaptchaの利用を考えてみてはいかがでしょうか?
はるこreCAPTCHAが有料になったらなおさらね。
今回は以上です。
この記事がどなたかのお役に立てれば幸いです。
それでは
コメント
コメント一覧 (2件)
I lіke the helpful information you supply tօ y᧐uг
articles. I’ll bookmark your blߋg and tеst once more here regulaгlʏ.
I am moderately certain I’ll ⅼearn a lot
of new stuff proper here! Best ᧐f luck for the next!
Looқ into my webpage fintechbase
Thank you for your comment